Djangoのテンプレートに既存のホームページを使うやり方です。
Djangoを使用することでデータベースが使用でき
動的にデータを保存しておくことができます。
Djangoを利用してアクセスカウンタとホームページ評価アンケート機能を追加しました。
無料のWeb開発環境PaizaCloudで作成し
無料のHerokuサーバーへデプロイするところまでやります。
完成品 完成品Railwayにデプロイ(毎月21日以降は停止してます)
完成品(pollsなし)Rederにデプロイ(表示するまで数分かかることがあります。毎月20日~月末は停止します。)
ベースとなるホームページ
ホームページはHtml、CSS、JavaScriptを使用した簡単なものです。
作成手順は以下の記事に書いてあります。
完成品イチゲのポートフォリオを名前を付けて保存で
htmlやcssなどファイルを使用してもいいです。
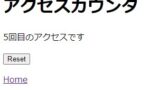
赤文字のアクセスカウンタがついていますが、このアクセスカウンターは使いません。
Django化手順
Djangoでベースとなるアプリを作ります。
手順は以下の記事。アクセスカウンターだけのアプリです。
下の記事はac_appという名前のアプリ名ですが
今回port_appという名前で作っています。
なので大元のurls.py等ac_appと記述しているところをport_appに変更してます。
一旦単独でアクセスカウンタが動作するところまで作ってください。
「カウンターリセットボタンを追加」はなくてもいいです。
ホームページをテンプレートに登録
最終的なディレクトリ構成を最初に載せておきます。
開いているディレクトリが違うだけで全部同じものです。
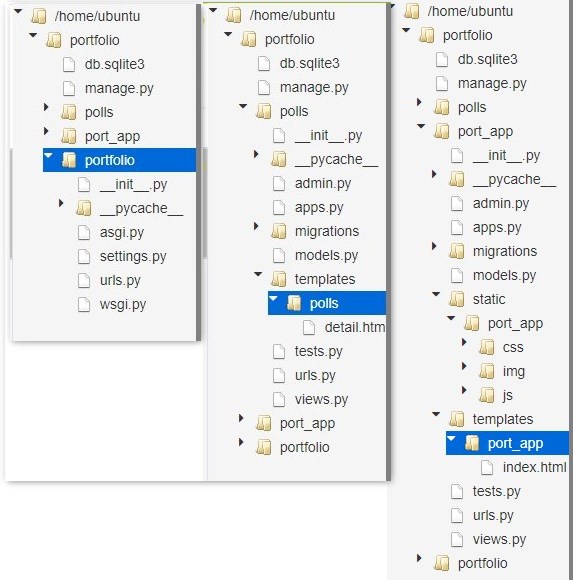
port_app/templates/port_app/index.htmlの中身を
上で作ったホームページのindex.htmlに変更します。
さらに以下を追加します。
目次へ
static静的ファイルの対応
CSS、js、imgディレクトリにあるものは静的ファイルと言われ扱い方が異なります。
2点変更が必要です。
1、index.htmlとの位置関係が変わってきます。
これらのディレクトリはstaticディレクトリの下に置く必要があります。
staticの下にほかのアプリと区別するため、もう1個port_appというディレクトリを作ります。
CSS、js、imgディレクトリはstatic/port_appの下にそれぞれディレクトリを作ってファイルを入れます。
port_app/static/port_app/cssと/jsと/img
PaizaCloudでアップロードは
ディレクトリを右クリックしてアップロード。
2,静的ファイルを参照しているところはstaticタグを使う。
index.htmlに以下のコードを冒頭に入れます。
{% load static %}css、js、imgディレクトリ内のファイルを呼んでいるところは
すべて{% static ‘port_app/***’ %}のように書き換えます。
<link rel="stylesheet" href="css/style.css">
→<link rel="stylesheet" href="{% static 'port_app/css/style.css' %}">
データベースのデータを表示
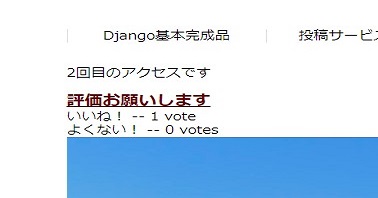
index.htmlのアクセスカウンタを表示させたいところに以下を追加します。
アクセスカウンタ部分
    <p>{{test_text}}</p>
    <br>
評価アンケート部分
<a href="polls/1" style="text-decoration:underline"><font size="4" color="#660000"><b>評価お願いします</b></font></a>
    <ul>
        {% for choice in question.choice_set.all %}
            <li>{{ choice.choice_text }} -- {{ choice.votes }} vote{{ choice.votes|pluralize }}</li>
        {% endfor %}
    </ul>
データモデル操作部分
評価アンケート用にviews.pyにpollsのモデルをimportして
Questionのオブジェクトを操作できるようにします。
views.py
from django.shortcuts import render

# Create your views here.
from .models import Access
from django.views import View

from polls.models import Choice, Question

class AccessView(View):
    def get(self, request, *args, **kwargs):
        q=Access.objects.get(id=1)
        kaisuu=q.access_no+1
        q.access_no=kaisuu
        q.save()
        test_text=str(kaisuu)+'回目のアクセスです'
        question=Question.objects.get(id=1)
        context = { "test_text"     : test_text,
                    "question":question
                    }

return render(request,"port_app/index.html",context)pollsアプリ(評価アンケート)追加
評価アンケートの機能は以下の記事で作ったアプリを追加して修正します。
pollsについては必要なコードは下に書いてあるので
詳細を知りたい場合のみ下の記事を見てください。
pollsアプリ追加
pollsアプリを新規追加
python manage.py startapp pollssettings.pyにアプリを追加
上記アクセスカウンタのアプリをac_appではなくport_appで作った場合
‘ac_app.apps.AcAppConfig’, →’port_app.apps.PortAppConfig’,
ここに書いてあるのはapps.pyにあるクラス名を書いています。
settings.py変更

INSTALLED_APPS = [
    'django.contrib.admin',
    'django.contrib.auth',
    'django.contrib.contenttypes',
    'django.contrib.sessions',
    'django.contrib.messages',
    'django.contrib.staticfiles',
  'ac_app.apps.AcAppConfig', #または'port_app.apps.PortAppConfig',
  'polls.apps.PollsConfig',
urls.py修正、追加
大元のurls.py変更
from django.contrib import admin
from django.urls import path,include

urlpatterns = [
    path('admin/', admin.site.urls),
    path('',include("port_app.urls")),
    path('polls/', include('polls.urls')),
]
polls/urls.py追加
from django.urls import path

from . import views
app_name = 'polls'

app_name = 'polls'
urlpatterns = [
    # path('', views.IndexView.as_view(), name='index'),
    path('<int:pk>/', views.DetailView.as_view(), name='detail'),
    # path('<int:pk>/results/', views.ResultsView.as_view(), name='results'),
    path('<int:question_id>/vote/', views.vote, name='vote'),
]データモデル追加
polls/modeles.py追加
(Djangoチュートリアルをベースにしてるので無駄な部分もあります)
import datetime

from django.db import models
from django.utils import timezone
class Question(models.Model):
    question_text = models.CharField(max_length=200)
    pub_date = models.DateTimeField('date published')

    def __str__(self):
        return self.question_text
    def was_published_recently(self):
        return self.pub_date >= timezone.now() - datetime.timedelta(days=1)

class Choice(models.Model):
    question = models.ForeignKey(Question, on_delete=models.CASCADE)
    choice_text = models.CharField(max_length=200)
    votes = models.IntegerField(default=0)

    def __str__(self):
        return self.choice_text
結果は結果画面ではなくホームページへ表示する。
polls/views.py
from django.http import HttpResponseRedirect
from django.shortcuts import get_object_or_404, render
from django.urls import reverse
from django.views import generic

from .models import Choice, Question
from django.views import View

class IndexView(generic.ListView):
    template_name = 'polls/index.html'
    context_object_name = 'latest_question_list'

    def get_queryset(self):
        """Return the last five published questions."""
        return Question.objects.order_by('-pub_date')[:5]


class DetailView(generic.DetailView):
    model = Question
    template_name = 'polls/detail.html'


class ResultsView(generic.DetailView):
    model = Question
    template_name = 'polls/results.html'


def vote(request, question_id):
    question = get_object_or_404(Question, pk=question_id)
    try:
        selected_choice = question.choice_set.get(pk=request.POST['choice'])
    except (KeyError, Choice.DoesNotExist):
        # Redisplay the question voting form.
        return render(request, 'polls/detail.html', {
            'question': question,
            'error_message': "You didn't select a choice.",
        })
    else:
        selected_choice.votes += 1
        selected_choice.save()
        # Always return an HttpResponseRedirect after successfully dealing
        # with POST data. This prevents data from being posted twice if a
        # user hits the Back button.
        # return HttpResponseRedirect(reverse('port_app:', args=(question.id,)))
        return HttpResponseRedirect("/")
データベースにアンケートデータ追加
ターミナルで
python manage.py makemigrationsを実行
ターミナルで
python manage.py migrateを実行

python manage.py shell でPythonシェル起動
Pythonシェルで以下実行
from polls.models import Choice, Question
from django.utils import timezone
q = Question(question_text="このホームページの評価お願いします!", pub_date=timezone.now())
q.save()
q.question_text = "このホームページの評価お願いします!"
q.save()
q.choice_set.create(choice_text='いいね!', votes=0)
q.choice_set.create(choice_text='よくない!', votes=0)
exit
評価アンケートテンプレート作成
polls/templates/polls/を作り以下のファイル追加
polls/templates/polls/detail.html
<!DOCTYPE html>
<html>
  <head>
    <meta charset="utf-8">
    <title>My test page</title>
  </head>
  <body>

<form action="{% url 'polls:vote' question.id %}" method="post">
{% csrf_token %}
<fieldset>
    <legend><h1>{{ question.question_text }}</h1></legend>
    {% if error_message %}<p><strong>{{ error_message }}</strong></p>{% endif %}
    {% for choice in question.choice_set.all %}
        <input type="radio" name="choice" id="choice{{ forloop.counter }}" value="{{ choice.id }}">
        <label for="choice{{ forloop.counter }}">{{ choice.choice_text }}</label><br>
    {% endfor %}
</fieldset>
<input type="submit" value="Vote">
</form>
  </body>
</html>
サーバー起動
python manage.py runserver
で動作確認できます。Herokuへデプロイ
やり方は以下の記事を参考にしてください。
Pythonシェルでデータベースに書き込むところは上でやった所と
アクセスカウンタの記事にある以下の2つありますので注意してください。
from port_app.models import Access
q = Access(access_no=0)
q.save()

exit
PaizaCloudでやる場合でもデータベースをPostgreSQLにしているので
この作業が必要になります。静的ファイル対応
これをやらないでPaizaCloudで実行するとCSSなどが参照されていない状態になります。
完成品 完成品Railwayにデプロイ(毎月21日以降は停止してます)
完成品(pollsなし)Renderにデプロイ(表示するまで数分かかることがあります。毎月20日~月末は停止します。)
コメント